Wednesday, March 27, 2013

Bouquets to Art 2013: Highlights

This week is Spring Break and I don't have any classes, which is good, since it gave me some time to sort through all the pictures I took at Bouquets to Art last week! I will do a separate post about the fantastic arrangement I got to help out on, but here are a few highlights from this year's exhibition. I just love the creativity that so many of the designers used to interpret their artwork, and the skill involved in creating these pieces. There are more pictures in a Flickr album over here, if you're interested. Enjoy!


I just love this interpretation of Manuel Neri's Seated Girl II by Michael Holmes Designs — great color, shape, and full of attitude, just like the original!


Yoko Klingebiel's design was one of my favorite pieces in the whole exhibition. She captured Dorothy Napangardi's Sandhills with such elegance and restraint (and not to mention skill!).


Nathan Oliveira's Weaver, brought to floral life by Michiko Shimoda. I like how they relate to each other, as if they're in a conversation.


Thomas Hovenden's painting of an abolitionist leader on his way to the gallows, The Last Moments of John Brown, and the brilliant interpretation by Neil Hunt. Genius!


The team of Poppy's Petalworks came up with this pretty design for David Regan's Cod Tureen (not pictured). I love the color, and the contrast in texture between the cork bark and the flower petals. 


Friends of Filoli's version of William Joseph McCloskey's Oranges in Tissue Paper. Great choice of materials!


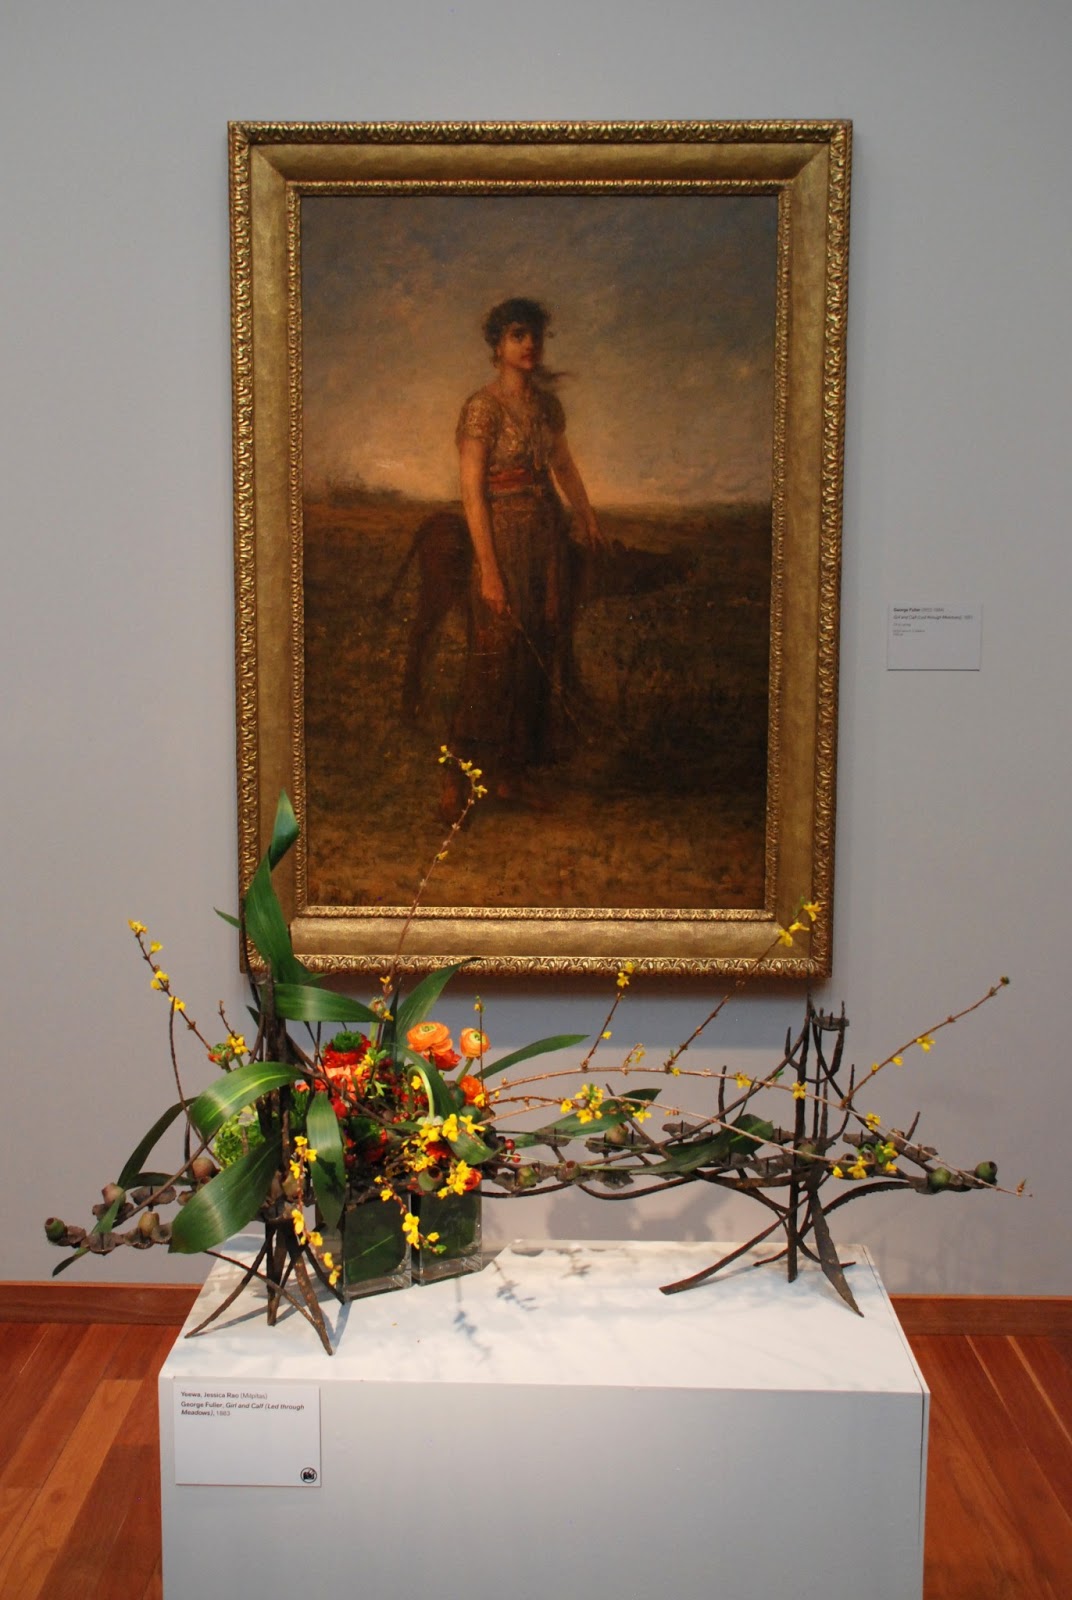
Jessica Rao captured the earthy and rustic feel of George Fuller's Girl and Calf...


...while Yukiko Neibert embraced the striking elegance of Robert Henri's Lady in Black with Spanish Scarf.


An arrangement and its muse: Guy Pène du Bois' Seated Nude, interpreted by the team of Lavender in Sonoma. The skin tones in their flower selection were delicious.


Another female-inspired design: Sunshine Flowers' take on Eastman Johnson's Woman in White Dress. Now who wouldn't love a dress made from the loveliest selection of white flowers?


Books and flowers? Heck yes! Main St. Floragardens shows us how, with their detail-rich interpretation of John Frederick Peto's Job Lot Cheap.


Soft textures and earthy tones in Joan McLellan Tayler's version of Figure of an ancestor or deity.

Swing on over to my Flickr album for more pictures of Bouquets to Art 2013, and check back later this week to learn more about the design I got to work on!

Sunday, March 17, 2013

Coming up: Bouquets to Art 2013

How I have lived in the Bay Area for almost nine years and hadn't heard about Bouquets to Art until last year, when the instructor of my floral design class encouraged us to visit this fantastic annual exhibition, I will never know. You'd think that an event combining art and flowers would have been on my radar all along, but it wasn't so. If you have never heard of it either, here's the long and short: Over 100 Bay Area floral designers choose a piece of artwork from the collections of San Francisco's esteemed de Young museum and create an arrangement, drawing inspiration from that particular piece. The arrangements are then put on display alongside the art that inspired them, for a special five-day exhibition.


Bouquets to Art 2013 is coming up next week, and I am extremely excited to be able to say that I helped to work on one very special piece for the exhibit this year. Here are a few impressions from last year's exhibition, and I can't wait for this year's show to open to the public on Tuesday!


Friday, March 8, 2013

Floral Design Seminar with Natasha Lisitsa

Natasha Lisitsa of Waterlily Pond Floral Design is one of the first floral designers whose work I ever registered as something uniquely different and beautiful, more art than craft, and distinctly recognizable. I first saw her work at a bridal show years ago, and have since seen it at weddings and events and of course at the DeYoung museum here in San Francisco, where she is one of the truly memorable contributors to the annual Bouquets to Art exhibit.


Wouldn't you love being greeted by this fantastic arrangement in your entryway?

I had the wonderful opportunity to assist Natasha and her team at a 3-day floral design seminar a few weeks ago, and between the days that I helped to prep and pack and set up for the event, and the time I got to spend watching her demonstrations and lectures and helping out the participants in the design studio, I had the most amazing time. Not only did I get a peek into how she finds her inspiration and goes about executing her ideas, but it also turned out that Natasha and her team are some of the nicest people you will ever meet. (And let's face it — nothing is sadder than to find out that somebody whose work you admire is impossible to be around.)


In the mornings, Natasha and her head designer Carla would demo some of their fantastic arrangements, talk about where the inspiration for each piece came from, and how they executed it. Natasha likes to work with unusual materials and isn't shy to incorporate rattan caning, metal mesh or paper filling material into her arrangements to create intriguing mechanics that don't need to — and shouldn't be — disguised (unlike traditional materials, such as floral foam or tape).


A couple of the designs Natasha and Carla presented on the first day, incorporating ratting caning and paper mesh.


In the afternoons, the seminar participants got to work on their own creations in the workshop studio, and were able to try out many of the materials Natasha and Carla had introduced in the morning sessions. Dye baths for rattan caning, power tools for drilling and screwing, and branches the size of small trees were all lined up along with the more usual floral tools and supplies. None of the students seemed intimidated in the least, and everybody went straight to work. Towards the end of the day, Natasha critiqued every arrangement, and offered candid and insightful advice on how a piece could be improved.


A couple of the students' designs from the first day of the seminar. Aren't they great?

The second day focused on large scale installations, something Natasha is definitely known for. She generously shared information about her workflow, stressed the importance of proper lighting for any floral arrangement, and discussed considerations regarding materials, size and scale, restrictions and many other aspects of creating larger-than-life floral sculptures like Elemental, her 2009 Bouquets to Art contribution. (If you're interested, here is a fascinating time lapse video of the installation of Elemental.)


The painted Manzanita branches in this gorgeous chandelier are somewhat of a signature feature in Natasha's work.

On the third day, the group got a special tour of the San Francisco flower market, and then went on to visit Yerba Buena Gardens, armed with their cameras and sketch pads. The idea was to capture some of the many architectural and landscaping details of this urban parklet, which they were then asked to use as inspiration for an arrangement to complete that same afternoon (think Project Runway challenge). The results were as diverse as they were impressive, and really showed how much the participants had embraced Natasha's affinity for exuberant creative expression and bold use of unusual materials.


During the critique for the Yerba Buena Gardens-inspired arrangements at the end of the third day.

The seminar was hosted in a formerly industrial building in San Francisco's Dogpatch district, which is now home to mostly creative businesses — photographers, event planners, catering companies — and has sweeping views of the city and the East Bay. Natasha and her team had made sure that the seminar participants (some of them from places as far as Florida and Hawaii) got to take in as many of San Francisco's treasures as possible and didn't run out of energy, so they served up tasty breakfasts and lunches from hip local businesses like Kitchenette. We got to use the space of Hands On Gourmet for our lunches, and ever since I'm thinking about possible opportunities to host a cooking class party there.


It was really fantastic to be part of the seminar, and I got a lot of inspiration and new ideas from it that I can't wait to try out. And judging by their enthusiasm, the participants from across the country all felt the same. Thank you, Natasha and team!

Saturday, February 9, 2013

Super Bowl flower arrangement

The San Francisco 49ers may have lost the Super Bowl last Sunday, but it certainly wasn't for the lack of a good centerpiece. I made a football-inspired arrangement for a party at my friends' house, using a Mitsumata branch to suggest the shape of a goal, and a carnation-studded football propped up on an acrylic rod. I wasn't able to get rust-colored carnations for the ball like I had wanted, so I ended up going with 49ers colors: red, white, and a hint of gold. Not exactly what I had in mind, but I needed to improvise.


The grass was made from a variety of Dianthus barbatus, a cousin of the carnation, and the whole thing looked sort of cute surrounded by everybody's favorite Super Bowl foods. The Mister and I had made a batch of Chili's Southwestern Eggrolls and Iowa Girl Eats' Mini Corn Dog Muffins, there was a three layer dip, and guacamole, and chips, and chili, and... oh, right, a football game on TV.


I thought Beyoncé's fierce halftime show, the excitement of a 34-minute power outage, and the 49ers' thrilling comeback after said power outage made for a really entertaining Super Bowl. And didn't you just love all those animal commercials?


This was my first-ever floral 'sculpture', and while it didn't exactly represent my usual design aesthetic, I was very happy with it. It was a challenge in materials, stability, and balance, and I had such fun making it. It came out looking fairly similar to my early sketch, and with the help of some casting plaster and floral foam, the structure easily survived transportation to my friends' house (I added the football once we were there). Now if only the 49ers had won.

Friday, February 1, 2013

Boutonnière and corsage roundup

Since I mentioned the other day how much I enjoy making what is often called 'personal flowers' or 'body flowers' in floral design terms, I thought I could do a little roundup of some of the corsages and boutonnières I made in class during the past year.


This is one of the boutonnières I made to go with my garden-inspired pew décor last week. Just a single orange tulip, backed with a folded tulip leaf, some filler, and a raffia wrap for a pop of color.


Another take on the garden-boutonnière: a lavender blossom on a gardenia leaf, supported with a loop of angel vine. This one smelled great, too!

Making a corsage was actually the very first thing we did in the first floral design class I ever took. We started by learning how to make a florist's bow, and how to wire and tape different types of flowers and foliage to create the elements that would then be assembled to make up the corsage.


These were the first corsages I ever made — not bad, but certainly some room for improvement.

While some of the techniques you need to learn for making corsages or boutonnières are fairly specific to creating personal flowers (namely wiring and taping flowers — that is, replacing the natural stem of the flower with one consisting of wire and floral tape, which allows you to bend the flower in whichever way you want it to face, secure it permanently in the miniature arrangement, and lock in some moisture), other aspects are more general and apply to arrangements of any size and style (think of balance, harmony, and transition, which are as important in a tiny boutonnière as they are in a huge arrangement). Hence, learning how to make a boutonnière or corsage is a great starting point for studying floral design, albeit on a really small scale. I happen to love miniature things (Mini cupcakes! Tiny hats! Kittens!), which is probably why personal flowers are right up my alley.


I love the vibrant colors in this corsage made with a single rose, freesia, wax flower, ivy and seeded eucalyptus. I'm pretty sure I had summer on my mind when I made it!

Preparation is key when making a boutonnière or corsage; you want all of your elements clean and ready to go. Assembling the often tiny pieces can be a challenge to your fine motor skills, and you don't want to have to put everything down and start over just because you forgot to properly prepare one of your elements.


The different textures of green blackberries, seeded eucalyptus and sea holly make for a pretty backdrop for the agapanthus floret and buds in this corsage.

We have been practicing making corsages and boutonnières quite a bit in several of my classes, mainly to become faster at it. After all, they are a fairly small item in a wedding order, and you should be able to put them together efficiently. At the same time, they shouldn't only be pretty but need to hold up and be comfortable to wear: no exposed wires that could catch fabric or skin, and well balanced so that they sit correctly against a lapel or wrist.


During a critique with one of my instructors, Jenny Tabarracci. Don't the corsages look pretty all lined up like that?

We also made corsages to learn about how to handle special flowers like stephanotis and gardenia. Gardenias do well with a backing of leaves to protect the delicate petals, which will turn brown upon contact with our skin's oils. Try making a corsage without touching the main flower!


Gardenia blossoms and stephanotis florets are highly fragrant, so this corsage smelled heavenly. I wore it going out the evening after class as a perfumed accessory. Who says corsages are just for weddings and prom?

If it were up to me, wearing a boutonnière or corsage on a regular basis would undergo a huge revival. Flowers are such a pretty fashion accessory, and you can tailor them to any outfit or occasion. And what's not to love about carrying a lovely scented, miniature flower arrangement with you all day?


I made these Bavaria-inspired boutonnières for a birthday party at a German restaurant during Oktoberfest. Guinea fowl feathers are a lovely stand-in for the tufts of animal hair traditionally worn on alpine Trachten hats.

P.S. If you're not tired yet of looking at miniature flower arrangements or are looking for more inspiration on boutonnières and corsages, check out my Pinterest board of body flowers.
Related Posts Plugin for WordPress, Blogger...